How to Install Halo-Lit Sign Letters
Sign Installation has never been easier!
This step-by-step guide for installing Halo Lit and Backlit sign Letters will show you just how it is. By using our handy mounting templates and the included hardware, the process is simple and painless!
Table of Contents
What You Will Need
- Signage and/or Letters
- Mounting Template (included)
- Stud Mounts/Threaded Rods (included)
- Spacers/Stand-offs (included)
- Power Supply (included)
- Wire Nuts (included)
- Extra Wire (included)
- Drill & Drill Bit (3/16")
- Tape Measure
- Level
- Painters Tape
- Clear Silicone
NOTE: If installing on Stone or Brick use a 3/16″ Masonry Drill Bit and Hammer Drill
Before You Get Started
1) Electrical safety & code
- Halo-lit letters require a power supply/driver (usually low-voltage). If you are tying into building power (120V/230V), use a licensed electrician and follow local code.
- Always turn off power at the breaker before making any electrical connections.
2) Power supply location matters
- Plan where the power supply will live before you drill: common options are inside the wall, above a drop ceiling, in a nearby cabinet/closet, or in an exterior-rated enclosure.
- Make sure it remains accessible for future service. Drivers can fail over time—don’t permanently bury it without access.
NOTE: The power supply must be installed within 10ft of the signage location. If you cannot install the power supply within 10ft, then consult your electrician or contact us.
3) Test illumination before final mounting
- Always test the letters and power supply on the ground before installing. It’s much easier to fix a wiring issue before everything is on the wall.
- Connect the letters to the power supply temporarily (per your wiring diagram / labels) and confirm:
- All letters light up
- Brightness is consistent
- No flicker
IMPORTANT: If anything doesn’t light, stop here and troubleshoot before mounting. Most issues are a loose connector, reversed polarity (low-voltage DC), or a missed connection.
STEP 1: Plan & Prep Sign Location
Determine where the sign will go and how it will be centered/aligned. Mark a light centerline or reference point if needed

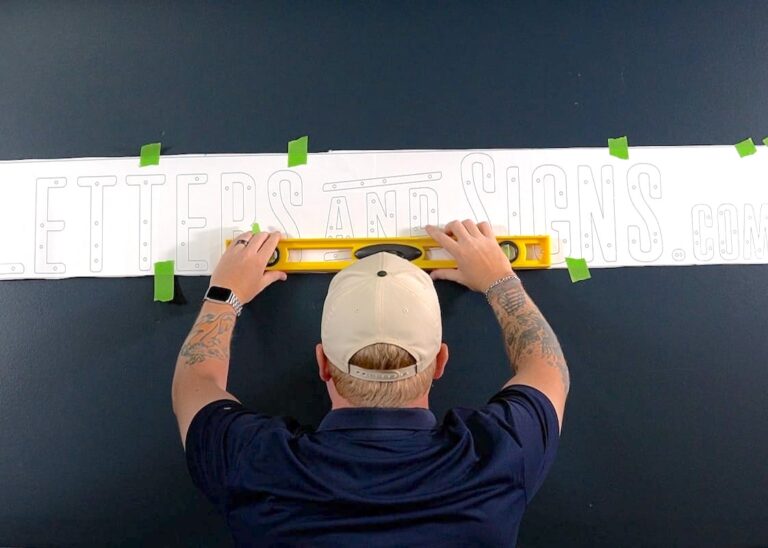
STEP 2: Position Template
Lightly tape the template to the wall using masking or painter’s tape. Use the template’s center marks/notches (if included) to help align it.
TIP: Dont fully tape down the template yet – you may adjust it in the next step

STEP 3: Level Template
Ensure the template is level on the wall.
Then apply more tape. Ensure the template is taped tight and flat against the wall.
STEP 4: Drill Holes
Using a drill bit slightly larger than the stud diameter (usually 3/16″ bit), drill straight through the paper template at each stud mark and into the wall. There will also be markings for electrical holes.
If running through-wall wiring, drill wire pass-through holes as marked. This hole might need to be slightly larger than the holes for the mounting hardware.
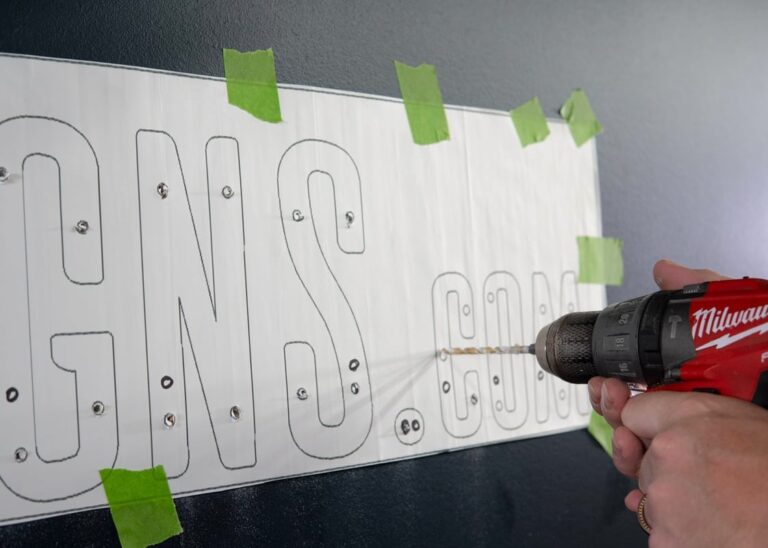
IMPORTANT:
Don’t oversize holes—loose anchors can cause letters to sag, which ruins halo consistency.
For Solid Wall (brick, concrete, block, etc): Drilling through the entire wall for mounting hardware is not necessary as long as the mounting hardware can go 2” deep into the wall. Wire holes still need to go through entire wall.
For Drywall or Siding: Hardware should go 2” deep into wall, and usually no additional anchoring is required.
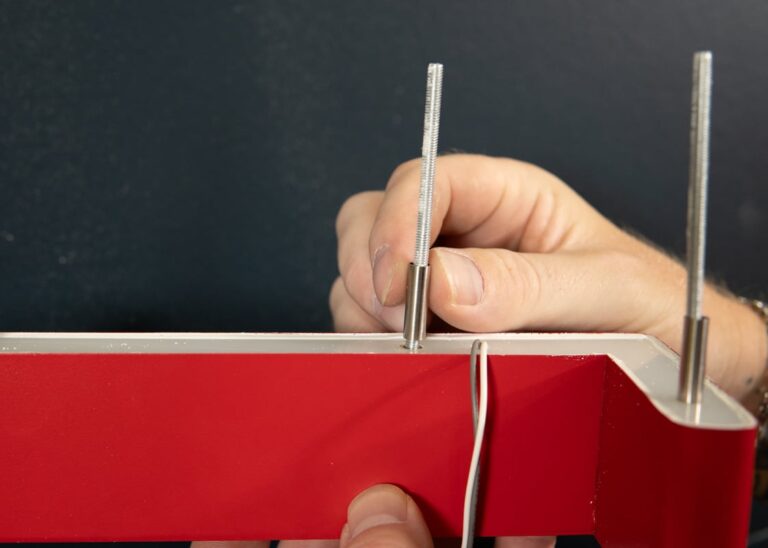
STEP 5: Attach Hardware
Hand-Tighten the stud mounts (threaded rods) into the holes on the back of letters. Slide standoffs over studs.
IMPORTANT: Do not overtighten. Just hand-tighten until the feel secure and not wobbly.
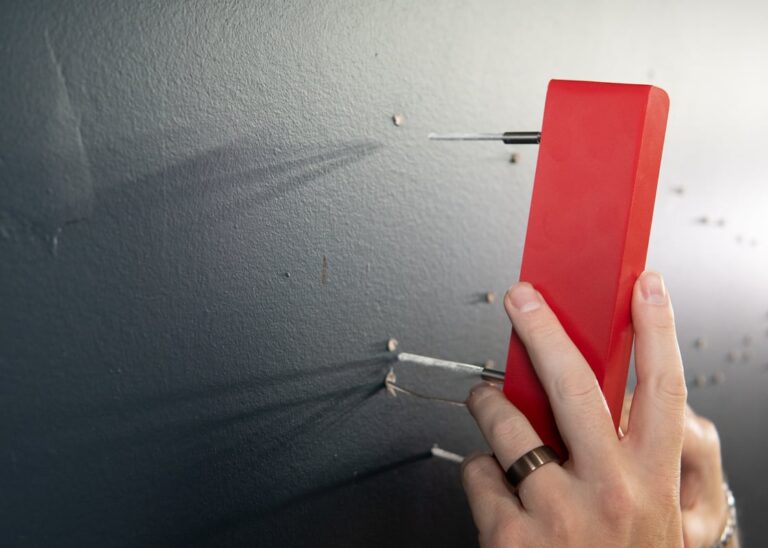
STEP 6: Test Fit a Few Letters
Carefully remove the template and clean dust from the holes (vac/brush works great).
Then do a quick dry run:
Place one or two letters onto the wall (no silicone yet) to confirm everything lines up. Adjust any tight holes as needed.
STEP 7: Fill Holes with Silicone
Fill each drilled hole partially with silicone (about 1/3 full is usually enough). You want coverage—not a hole overflowing with sealant.
This helps lock the studs in place and reduces moisture exposure.
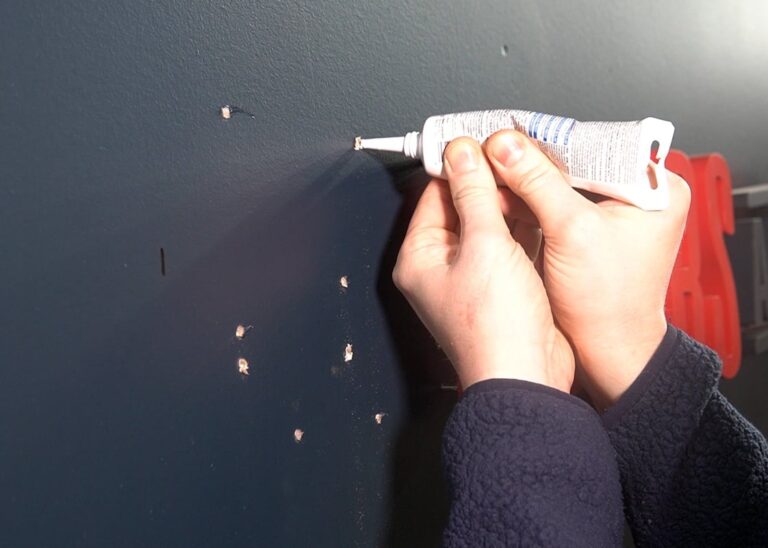
STEP 8: Apply Silicone to Studs
Apply a small dab/light coat of silicone to the tips of the studs (or the portion that will sit inside the wall).
IMPORTANT: Less is more. Too much silicone can squeeze out around the letter edges.

STEP 9: Insert Wires into Wall
Every individual Letter or Logo Element will have a set of wires. For a clean look, each wire will need to go into the wall so it’s not visible on the front. Wires must be accessible so connections can be made.

Common Wiring Methods & Locations:
– Behind Wall: Easiest and most ideal way to wire the signage. Wires go through the entire finished wall and connections are made.
– Inside Wall and/or Access Panel: When wires are hidden inside the wall because a “behind wall method” is not possible or desired. Sometimes the wall must be cut open (and re-patched) or wiring must be fished through studs inside the wall to make necessary connections. An optional in-wall Access Panel (sold separately) can also be installed to access wires.
– Ceiling: Wires are fished through the wall up into the open ceiling or drop ceiling (ceiling tiles).
Note: If you do not have access to wires, check with an electrician or contact us to see if there are other options for installation. Panel Mounted, Raceway Mounted and other Plug & Play options may be more suitable if you do not have access to wiring.
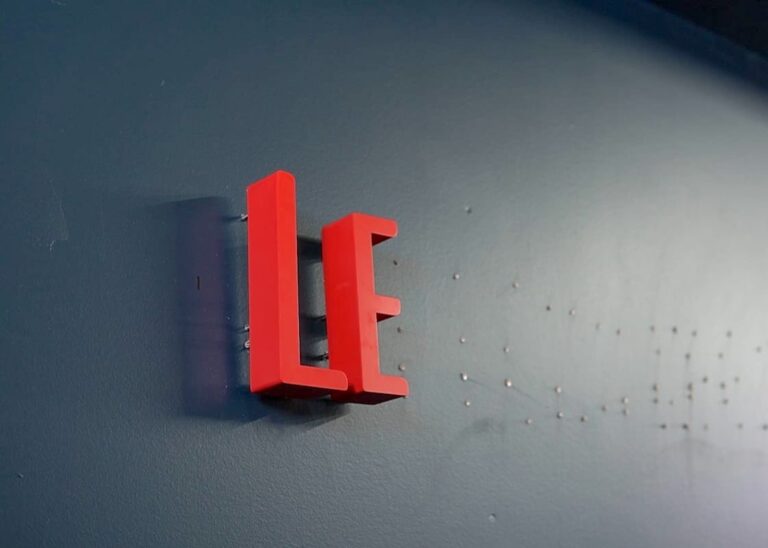
STEP 10: Mount Letters
Starting with one letter, after feeding the wire through the holes, align the studs with the holes and press the letter straight into place until the spacers sit flush on the wall
Repeat for each letter.
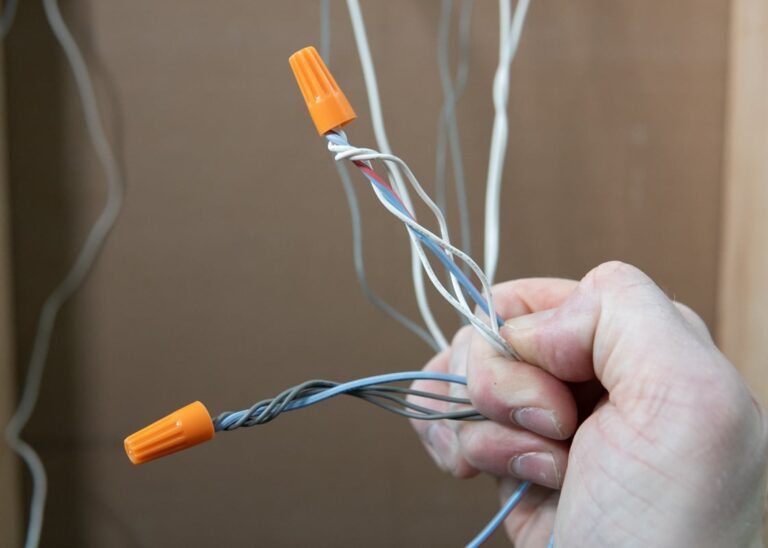
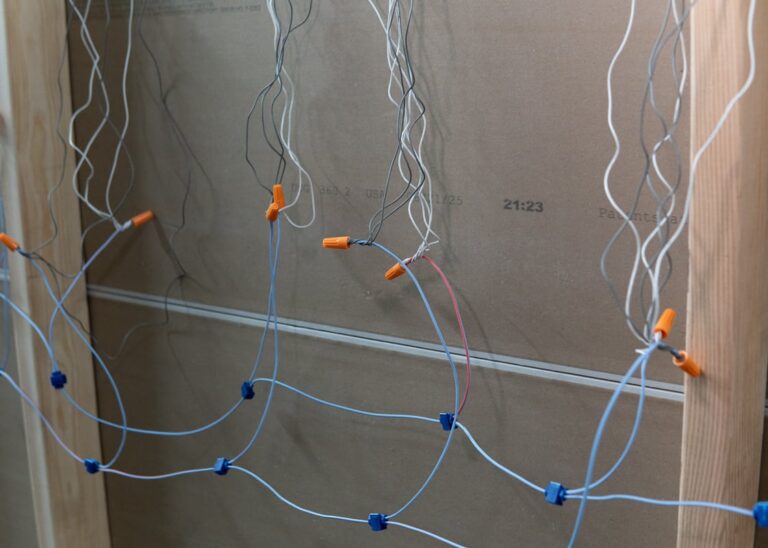
STEP 11: Make Connections
Bundle same-colored wires together. Pigtail them to an extra wire that will go to the power supply. You’re creating a “trunk” lead from the bundle to the power supply output.
Repeat until all the wires coming from the letters have been connected.

STEP 12: Connect Wires to Power Supply
Connect the trunk lead wires to the OUTPUT DC side of the power supply.
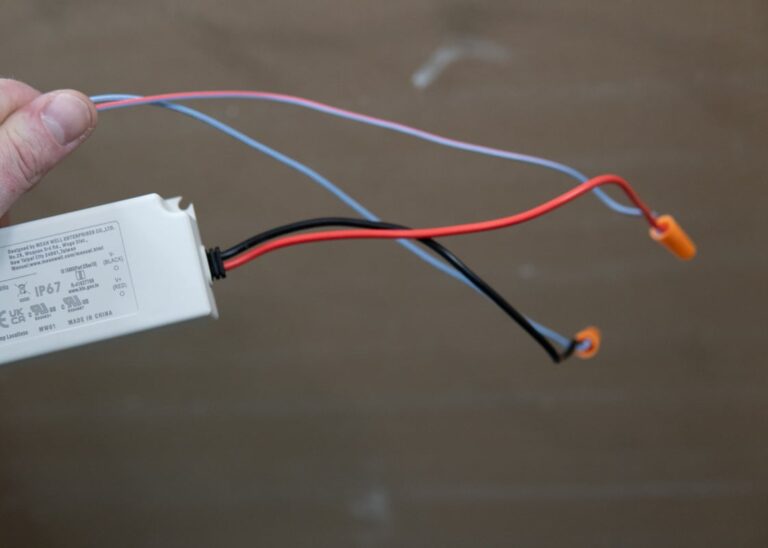
STEP 13: Double Check Connections
Double check connections and ensure polarity (+/-) is correct according to wiring diagram.
Ensure wires from letters are on OUTPUT side of power supply.
STEP 14: Connect Power Supply (AC SIDE) to Building 120v Power
Only perform this connection once you CONFIRM POWER IS OFF or DE-ENERGIZED.
Connect the AC side of the Power Supply to your building’s 120v power.
Turn on power and ensure:
1) All letters illuminate
2) Halo glow is even
3) No flicker
4) No wires visible

THAT'S IT!
Now take a step back and enjoy you sign.
Do a happy dance, give yourself a pat on the back, pop champagne! Whatever it is – you deserve it!
Common Mistakes & Troubleshooting
Symptom: Everything lights except one letter/element.
Fix: Check the connector/splice, confirm polarity (+/–) on DC systems, and look for a missed connection before mounting further.
Symptom: Letters flicker, dim, or cut out randomly.
Fix: Check for loose connections, confirm the power supply isn’t undersized/overloaded, and reduce long low-voltage runs that can cause voltage drop.
Symptom: Bright near the driver; dim/flicker farther away.
Fix: This is classic voltage drop. Keep low voltage runs shorter, use thicker wire (lower AWG), avoid daisy-chaining across a wide sign, and feed power in multiple points/home runs when needed.
Symptom: Letter droops, rocks, or sits away from the wall.
Fix: Don’t oversize holes. Dry-fit a couple letters before silicone; adjust tight holes carefully and clean dust from holes.
Symptom: Intermittent failures, corrosion, or water-related issues over time.
Fix: Seal wall penetrations and use exterior-rated drivers/enclosures when outdoors; keep the driver accessible for service.
FAQS
Yes—halo-lit letters and LEDs are typically exterior-rated and can be used outdoors. If your wiring connections and/or power supply must be outside (instead of inside the building), make sure all connections are protected from the elements: use silicone-filled wire nuts (or weatherproof connectors), seal wall penetrations, and house the power supply in a waterproof / weatherproof enclosure when necessary.
Yes—test letters and the power supply on the ground first and confirm everything lights evenly with no flicker. Fix wiring issues before anything goes on the wall.
Plan it before drilling. Common locations include inside the wall, above a drop ceiling, in a nearby cabinet/closet, or an exterior-rated enclosure—and it should remain accessible for future service.
If you’re tying the driver into building power (120V/230V), you can use a licensed electrician if necessary and follow local code. Always turn power off at the breaker before making connections.
Most commonly it’s voltage drop on long low-voltage runs. Reduce run length, use thicker wire, avoid long daisy chains, or feed power from multiple points.
Common causes: an undersized/overloaded power supply, loose/poor connections, voltage drop, or incompatible dimming/timer controls.
If the sign is wide, avoid long daisy chains—use home runs back to a junction or inject power at multiple points to reduce voltage drop. See the wiring diagram listed above (Step 11) for the ideal wiring methods.
Ready to get started?
Send us an email or fill out a quote form and we’ll get back to you within 1 business day!